 Steps to Success
Using the headings.html web page you created in steps, we'll discuss the type selector and grouping. We'll look at how we can utilize grouping efficiently within our CSS file.
- Open the headings.html file in steps folder.
- Create a new file in NotePad and add the following code.
/* CSS document */
This is a CSS comment. It will help you know which file is the css and which file is the html. - Save the file as headings.css inside the stepstyles folder
- Add the following code to the <head> of headings.html
<link href="stepstyles/headings.css" rel="stylesheet" type="text/css" />
Type Selectors
The type selector matches the tag name of any element type within our documents.
- Add the following h1 rule to headings.css:
h1{
font-family: Verdana, Geneva, Arial, Helvetica, sans-serif;
color: #666;
background-color: transparent;
}
Illustration 1: A simple type selector
The results are in Image 1.
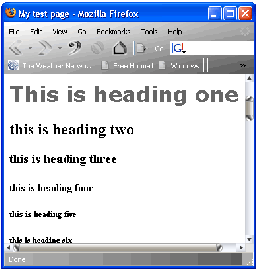
Image 1: Our h1 rule
The rule in Illustration 1 would make all instances of the h1 element assume the properties and values we have declared within the rule . We have simply declared that all instances of our h1 element will comprise of a set of fonts. They will be dark gray in colour and the background will be transparent.
Group Type Selectors
- Add the following (in red) to headings.css:
h1, h2{
font-family: Verdana, Geneva, Arial, Helvetica, sans-serif;
color: #666;
background-color: transparent;
}
Illustration 2: Grouping our selectors
In Illustration 2, I have added a comma immediately after the h1 selector and then I added an h2 selector. The results are in Image 2.
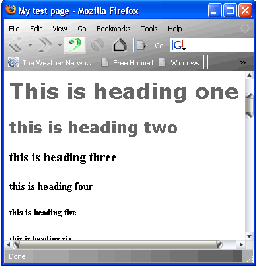
Image 2: Our h1, h2 rule
We can see from the image above that our h1, h2 rule has completed the styling we set for both our h1 and h2 elements; this is pretty cool. What we have done is separate our type selectors with a comma. What this means is that each selector in the rule will be styled exactly the same, just as if they had been written individually. This means we can use this technique to declare the common properties that exist within each of our elements.
- Add the following (in red) to headings.css:
h1, h2, h3, h4, h5, h6{
font-family: Verdana, Geneva, Arial, Helvetica, sans-serif;
color: #666;
background-color: transparent;
}
Illustration 3: go crazy!
If we are using all those h elements, and they fit into our generic rule , then this is the best thing to do. No sense in re-writing the rule multiple times when just the once will do.
Preview in the browser:
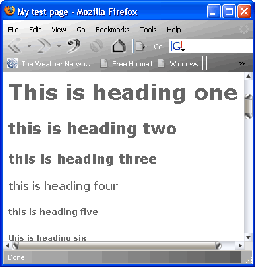
Image 3: Our h1 to h6 generic styling
We see the styling has been applied to all our h elements, from h1, right through to h6.
Setting The Specifics
Now that we have seen how we can group our type selectors, and therefore reduce the amount of code we need to type - not to mention that we can now maintain our CSS easier - we can look at setting the specifics for our h elements.
- Add the following (in red) to headings.css
h1, h2, h3, h4, h5, h6{
font-family: Verdana, Geneva, Arial, Helvetica, sans-serif;
color: #666;
background-color: transparent;
}
h1{font-size: 1.2em;}
h2{font-size: 1em;}
h3{font-size: 0.9em;}
h4{font-size: 0.8em;}
h5{font-size: 0.7em;}
h6{font-size: 0.6em;}
Illustration 4: Sizing our h elements
Let's take a look at how our CSS in Illustration 4 is rendered by the browser:
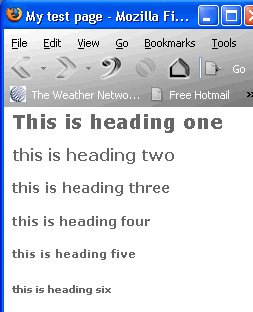
Image 3: Our h elements are now sized
In Illustration 4, I have set a size for each of the h elements we have been working with: h1 to h6. What if we decided that all our h elements now require a margin of 25px to the left, to conform to the layout we have in mind for our page? Well we can easily accomplish this now by revisiting the generic rule . We need only add the margin property we require in a single location to affect all our h elements.
By writing our CSS in this manner we are giving ourselves options. We have the ability to add properties into the individual rule we have created for our h elements - if the rule is only required by that specific element. We also have the ability to go back to our generic rule to add any properties that are required by our h elements on a global basis.
Specificity
The lower the rule in our style sheet the greater the importance of the rule - that is, the closer it is to the actual content that is to be styled - this provides us with further options. Should our client request one day that all the h3 elements be red in colour, we can simply add that value to the rule for that specific element, as shown in Illustration 5.
- Add the following (in red) to headings.css
h3{
font-size: 0.9em;
color: red;
}
Illustration 5: Making the h3 elements red in colour
Make that change in your test page and preview it in your browser. You will notice the colour of your h3 is now red, while all the other h elements are unaffected, as we would expect.
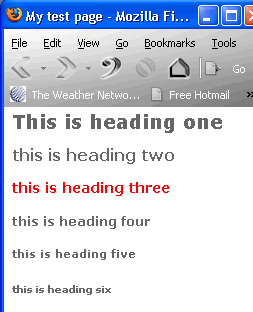
Image 4: Our h3 element is now red
As you can see from these simple examples, it is easy to build on each of the individual rule. The generic rule should be at the top of your style sheet to prevent it overriding your individual rule settings. Try moving the generic rule to the bottom of your style sheet and see how the gray colour in that rule overrides the red colour in the h3 rule .
Conclusion
In this tutorial, we have learned that a type selector will style all instances of its type on every page the CSS is linked to. We have also seen how we can group our selectors. Grouping makes the maintenance of our style sheets much easier. Grouping condenses our rule, makes everything more manageable and easier to read.
This grouping is not limited to type selectors. Try experimenting with what we have covered here and see how far you can go. We briefly looked at the cascade and saw how a greater importance is placed on a rule when it is lower in the style sheet. It will always win out against a rule that is higher in the style sheet with the same selector.